Showing posts with label Stampin' Tips. Show all posts

Saturday, April 04, 2009

Simple watercolouring


This is a card that I designed for a stamping class that I had this afternoon and I thought that I would share this simple watercolouring technique with you... Notice how the cupcake is shaded. This is something I always admire in card samples but I've felt challenged to do it myself. Well, here's the trick!

First, I stamped the cupcake (from the new Wagon Full of Fun set in the mini catalogue) onto watercolour card stock using StazOn ink. Then I used Stampin' Write Markers to colour. I coloured the flame with Barely Banana and the candle with Sage Shadow. Next, I outlined the icing with my Pixie Pink Stampin' Write Marker and then I used my Aqua Painter to blend the colour. I just kept running the Aqua Painter over the Pixie Pink ink so that I could use it to colour in the icing. I let the water dry and then I applied more Pixie Pink ink to add a bit more colour. I blended again with the Aqua Painter. I did the same with the bottom of the cupcake, using a Close to Cocoa Stampin' Write Marker. It's a simple way to watercolour and give great results.

Happy stampin'!

Bev.

(All images copyright 1990-2009 Stampin' Up!)

Tuesday, March 25, 2008

Tuesday's Tip...

I had this all ready to go last night, but my internet decided to take the night off so I couldn't get online... so frustrating!

Okay onto the good stuff. Here is something so cool... I had so much fun with this. Check out the ribbon slide on this card. It's from the Styled Silver Hodgepodge Hardware kit, but look closely... I've added some colour to it!

Here's how:

On a disposable surface (I used the lid from a sour cream container), squeeze out a small puddle of Crystal Effects. Then add a drop of ink refill. Mix with a toothpick. Next, use the toothpick to "paint" the inside ring of the ribbon slide. If you go outside the area you are adding colour to, use a clean toothpick to lift the extra colour off. Let it dry... I left mine for a couple of hours just to be sure that they were really dry before I used them.

You can go from this:


To this:

I played with a few colours... The one I used on the first card was Purely Pomegranate and I also played with Pretty in Pink and Lavender Lace. They all look great! I did notice that they seem to dry a bit darker so keep that in mind.

I made one more card with the Pretty in Pink ribbon slide. This card uses the stamp set called Simply Said.

I had to order another Styled Silver Hodgepodge Hardware kit so that I will have some more ribbon slides to play with!

Happy stampin'!

Bev.

(All images copyright 1990-2008 Stampin' Up!)

Sunday, February 24, 2008

A great ribbon tip...

This is another card that I stamped for the stamping class last week. I was inspired by a card that was published in the Stampin' Success - a magazine for Stampin' Up! demonstrators. This card uses the Priceless stamp set and I added the Canvas background. Unique colours again - Purely Pomegranate, Old Olive, Tempting Turquoise and Pumpkin Pie.

But, check out the ribbon... I was so perplexed by this ribbon because I couldn't figure out where Stampin' Up! sold a white ribbon with an orange stripe on either side. I went straight to my catalogue to try to find it and then after becoming a little frustrated, I returned to the Stampin' Success magazine to read the instructions... hmm, feeling a little like a man - not reading the instructions first! LOL!! So, here's how this happened:

It starts out with a piece of White Grosgrain Ribbon. For this card, I used the Pumpkin Pie Stampin' Write Marker and simply used the brush tip to colour along the edge of the ribbon. By doing this, you could make ribbon any colour!! You might find that it bleeds a little bit into the ribbon, but it's not really noticeable once added to your project. So, with a roll of White Grosgrain Ribbon and a selection of Stampin' Write Markers, your ribbon colours are endless!

Happy stampin'!

Bev.

(All images copyright 1990-2008 Stampin' Up!)

Wednesday, November 14, 2007

Fun Foam - a fun technique!

Fun Foam is the perfect addition to Christmas cards - especially cards with snowmen! It adds some fun texture and is so easy to use. Here's how:

1. Select your image and cut a piece of Fun Foam to the correct size. It's better not to cut the Fun Foam too large. I usually cut it to about the same size as the wood block of the stamp that I am going to use.

2. Ink your stamp with StazOn ink. Remember that because StazOn is a solvent-based ink, it does evaporate so you don't want to leave the lid off of it too long. For this technique though, I do leave my stamp on the pad until I'm ready to use it just so that the ink doesn't dry on the stamp while I heat the Fun Foam.

3. Use your Heat Tool to heat the Fun Foam. Don't get too close because you can burn the Fun Foam! I always place the Fun Foam on a piece of tin foil (shiny side up)for this step - the tin foil reflects the heat and helps to speed things up! You will want to heat the Fun Foam just until the edges start to curl up a bit - don't overheat or it will roll up and you won't be able to stamp on it!

4. Quickly press your stamp into the Fun Foam... you really need to be quick with this so that you get the stamp pressed in before the Fun Foam cools. Hold the stamp in place for 10-20 seconds so that the image is indented into the Fun Foam as it cools. Carefully pull the stamp off the Fun Foam. This is a good time to make sure your StazOn lid has been replaced!

5. If you want to add colour, use a Foam Applicator, Q-Tip or disposable makeup applicator to touch on Stampin' Pastels.

6. When you add your Fun Foam to your project, it's better to apply the adhesive to the piece that you are going to stick the Fun Foam to - if you apply pressure to the back of the Fun Foam, you can sometimes see marks through to the front.

Have fun with this technique! Fun Foam is available in your local craft store - but don't go in the stamp aisle...!! : )

Supplies used on this card:

Card stock: Brocade Blue, Real Red, Vellum
Ink: Brocade Blue for snowflakes, Basic Black for greeting, Jet Black StazOn for snowman (pg 186)
Stamps: Holiday Tag Team (pg 36), Fundamental Phrases (pg 155), Short & Sweet (pg 140)
Other: Stampin' Pastels (pg 186), Fun Foam


Happy stampin'!


Bev.


(All images copyright 1990-2007 Stampin' Up!)

Sunday, November 04, 2007

A new technique...

This is a card that you can stamp at Santa's Workshop (coming up on November 23rd - space still available!). It uses two new stamp sets - Holy Triptych from the Holiday Mini Catalogue and En Francais. The new technique, which I have no name for but it makes me think of colour washing, can be seen in the background of the oval. First, I stamped the Holy Family in VersaMark and embossed with Gold Glory Emboss Powder. Then I used an Aquapainter and picked up some River Rock ink and washed the background with the ink. You need to make sure that you have a fair amount of water on the bristles of the Aquapainter when you do this if you don't want too much colour left behind on your cardstock. As with so many things, you are better to add more if you don't get enough, but you can't take colour away once it's on. I used Very Vanilla card stock for this technique - the result is stunning! It actually almost looks like the card stock has a bit of a shimmer once this technique is done. This is a very simple but elegant card. Click on the card to see a larger view. I'm now thinking about other cards that I can create using this technique!

Our craft fair went really well this weekend... it was nice to see so many of you drop by! We were sold out of Snowman Soup shortly after the fair opened this morning - very popular little items! Mom will be busy making more this week in preparation for the Calico Christmas Craft Fair next weekend...

Happy stampin'!

Bev.

(All images copyright 1990-2007 Stampin' Up!)

Sunday, February 25, 2007

Faux Shaving Cream


I LOVE this technique!! I had the chance to introduce it at this last Stamp-A-Stack and it received some great reviews! The faux shaving cream technique produces the same great marbled look as the shaving cream technique, but without the mess and fuss of using shaving cream! You create the marbled look right on your stamp rather than as a background piece - you are sure to have fun with this simple technique. Here's what you need:

~ a solid stamp
~ a wheel with a fairly solid image
~ two colours of ink
~ card stock

I've used the Eat Cake stamp set with the Spot On jumbo wheel for this sample. Other wheels that would work well include Happy Jacks, Polka Dot Blocks, True Hearts, Scatter Sunshine or Bodacious... there are probably lots more!

Start by inking your stamp with a lighter colour of ink - I used Certainly Celery. Then roll a bit of your wheel onto your second colour of ink - I used Taken with Teal. You don't have to ink the whole wheel, just a small section will be plenty. Now, "kiss" your stamp with the wheel by swiping the wheel on the stamp. Twist your wrist as you tap or use a side-to-side motion if you wipe. The key to creating the marble swirl is in this movement - you are swirling the two colours of ink together a bit.

Before you stamp the image down onto your card stock, it's good to "huff" or breathe on it to remoisten the ink. Finally, you'll get to see your one-of-a kind art! Every image you do with this technique will be slightly different depending on how you swirl the ink together. Fun!!

Happy stampin'!

Bev.

(All images copyright 1990-2007 Stampin' Up!)

Saturday, January 20, 2007

Kissing tips...


Well, I must admit that if someone had told me a few years ago that I would be posting "kissing tips" on a website, I really would have thought they were crazy... but here I am doing it! Okay, "kissing" is a stamping technique so don't panic - it's safe to read this post! : )

Last night's Stamp-A-Stack featured two cards using kissing techniques. I thought I'd share some "how to" for you here. On this first card, the red heart in the middle is kissed. First, we inked up a corner of the Canvas background stamp with Real Red ink. Then, we pressed the clean heart stamp from Simply Said stamp set onto the Canvas stamp to pick up the Real Red ink. It picks it up in the design of the Canvas stamp so when you stamp it down, you have a patterned stamp! It's a good idea to breathe on the stamp before stamping with it to remoisten the ink.

This technique works best when you are pressing a solid stamp onto a patterned one... just imagine how many different looks you can get with one solid stamp and all the different background stamps! And, don't just think about the big background stamps - this will also work with stamps like By Design on page 160, Wonderful Weaves on page 162, the four sets shown on pages 164 and 165... there are probably lots more! In fact, if you look at the alphabet stamp in the Letter Patterns stamp set on page 165, you'll notice that it's actually printed backwards so that when you kiss a solid stamp onto it and stamp it down, you'll have the letters going the right way... it's like writing backwards and holding it in a mirror! You can see how they've used this technique on the scrapbook sample on this page of the Idea Book & Catalogue. You just need to make sure that your background stamp is bigger than the solid stamp you are using.

On this next card, we used a variation on the kissing technique. Instead of using the technique to ink the solid stamp, we are using it to remove ink from a stamp... Here's how:

Ink a solid stamp - in this example, the Big Blossom Sell-A-Bration stamp is used with Cranberry Crisp ink. Then, I used the little flower stamp out of the Little Pieces stamp set to press onto the Big Blossom and remove ink. The smaller stamp was clean and I stamped the ink off onto a scrap paper between each time I pressed it onto the Big Blossom stamp. You need to do this to remove ink from the little stamp so it can pick up more from the big stamp. Be careful not to let the little stamp slide when you press it down. When you stamp the Big Blossom stamp, the little flowers will show up lighter! Again, there are so many stamps that you can do this with... I saw another really nice idea where the small solid circle stamp from Simple Shapes had been used to lift ink from the Big Blossom. Any little stamp could be used - have fun!

Credit for this wonderful card goes out to Suzanne - I love the colours... Marigold Morning, Old Olive and Cranberry Crisp. The Twill Tape and buckle from the Antique Brass Hodgepodge Harware Kit are great accents. The Old Olive strip was stamped with the Weathered background stamp. Oh, wouldn't this background stamp be fun to "kiss" with?!!

Okay, one more "kissed" card that's been getting lots of positive comments... This one uses the Big Blossom stamp again. I inked the Paisley background stamp with Pretty in Pink ink and then "kissed" the Big Blossom onto it to pick up ink. Lots of little details to notice on this card... The Ticket Corner punch is used to notch out a little spot for some Pretty in Pink Brads. The paper piercing detail in all the corners is really nice. The clear button has a piece of Regal Rose card stock in behind it (punched out with the 3/4 inch circle punch). The Black Gingham Ribbon is actually thread right through the button and then tied in a knot of the front and the Pink Narrow Organdy Ribbon is then tied around it. The greeting is from the Happy Everything stamp set. A very elegant card that I copied from Debbie Olson. Thanks, Debbie!

Well, I hope you've enjoyed my kissing tips... Have fun!!

Happy stampin' (and kissin')!

Bev.

(All images copyright 1990-2007 Stampin' Up)

Saturday, December 30, 2006

Gift Card Holder


Here's a great idea that I received from a demonstrator in my downline, Robin. This would be perfect to present a gift card to someone... The first photo is of the gift card holder closed. Notice how Robin used a piece of Hodgepodge Hardware at the bottom to hold the flap closed. You could probably also tie a ribbon around the package or use the slot punch if you don't have a piece of Hodgepodge Hardware.

The next photo is with the top flap open. I like how Robin stamped this part... She has used the Carte Postale stamp set from the Winter Mini Catalogue along with the French Script background stamp on her gift card holder.


This last photo is of the package open and you can see how the gift card is inserted into a little pocket inside.

Let's see if I can give you some dimensions on this so you can make one... The main piece of card stock (in this sample, Chocolate Chip) is 5 1/2" tall x 8" wide. It is scored 2" from the top and 2" on each of the sides. Then the squares on the top left and right are cut out and the bottom rectangles are also cut out, along the score lines. The piece of Mellow Moss card stock that Robin used on the front is 3 3/4" wide by about 3" tall after it was ripped at the bottom (you would need to cut it a bit longer to leave enough to tear if you want to do this. The pocket inside is 3 3/4" wide x 2" tall secured on three sides - I would use Sticky Strip on this to be sure that it holds well. Robin added a piece of ribbon across the top for a nice accent. Closed, the little package measures 4" x 3 1/2". If you need better instructions, let me know! Remember, you can click on any of the photos to see them enlarged.

Happy stampin'!

Bev.

(All images copyright 1990-2007 Stampin' Up!)

Saturday, November 25, 2006

Let it snow, let it snow, let it snow...

It started snowing at about 3:00 this afternoon... the ground is now a blanket of snow. It's beautiful!

So, it was the perfect time to stamp packages of snowman soup! This was an idea that came from a demonstrator in my downline, Suzanne. She made the package that's at the top of this post.

I wanted to play with some different colours, so I stamped mine in Brocade Blue. Here's what you need to make your own snowman soup:

1 package of hot chocolate
1 dozen (or more!) miniature marshmallows
1 small candy cane
1 piece of card stock cut to 4 1/4" x 11"
1 medium flat cellophane bag
1 10" piece of ribbon
stamps, ink, adhesive, scissors and a punch

Stamp the piece of card stock. Then score it at 1", 5 1/4" and 6 3/4". Fold to make package. Put the hot chocolate, marshmallows and candy cane into the cellophane bag - I folded the top of the hot chocolate package down a bit so it fit better. Then fold the top of the cellophane bag down so that it fits inside the card stock package. I ran some SNAIL adhesive inside the package to hold the cellophane bag.

Next, you'll need to punch holes in the top to thread the ribbon through. I used the rectangle hand held punch for this. You are going through 3 layers of card stock plus the cellophane bag so it takes some strength - if you aren't able to go through all of this at once, punch through the front flap first, then lay it down and punch in the same place through the other layers. Thread your ribbon through and tie a bow on the front. Attach your stamped image to the front. I printed "Snowman Soup" onto the Whisper White card stock first then stamped the snowman family from Flaky Friends.

This would make a great little gift, maybe a stocking stuffer or a little decoration on a table... Or, use it in place of a card - you could tie a little tag onto the front to add a greeting and sign it. I think everyone would love having a mug of snowman soup!

Happy stampin'!

Bev.

(All images copyright 1990-2006 Stampin' Up!)

Saturday, November 18, 2006

So Sparkly...


If you love sparkly cards, this is a technique for you! It's called Faux Diamond Dust. It's a great technique to keep in mind when you are stamping your winter cards - imagine using this on a snowman...


It might be a bit hard to see on the scan, but the main image on this card - the "friends" piece - is all sparkly. You might see it a bit better if you click on the picture to get a larger image.

This is a really simple technique with our Iridescent Ice Emboss Powder. This powder has glitter right in it so once you heat it, the glitter is sealed right into your card.

Start by stamping and colouring your image. Then apply VersaMark ink direct to paper (see the photo) to cover the whole front of the image. Next, sprinkle the Iridescent Ice Emboss Powder over the card stock. The emboss powder will stick to the VersaMark ink.


Use your Heat Tool to "melt" the emboss powder. You will see this powder turn clear. I always emboss on a piece of tin foil because it helps to reflect the heat back up from underneath which speeds up the embossing and also minimizes the card stock curl that often happens from the heat.


Let it cool for a minute and that's it! Your piece is all sparkly now and ready to be added to your card or scrapbook page.

So, are you wondering where this stamp is from? It's a great new set called "Love Matters" which is in the upcoming Winter Mini Catalogue. It will be available from December 1st - February 28th.

I'm making this card for a swap that I'm in. I really like the colours together - Rose Red, Certainly Celery, Apricot Appeal and Almost Amethyst. I got the combination from my Colour Coach - I love this tool and use it nearly everytime I'm trying to create a card. It takes the guess work out of colour combinations, something that I'm not so great with!

Hope you'll give this technique a try... By the way, you can do this on a piece of plain card stock and then use it as a background. Here's a sample doing just that using the "Pretty Princess" stamp set. The piece of Regal Rose card stock is nice and sparkly!

Happy stampin'!

Bev.


(All images copyright 1990-2006 Stampin' Up!)

Tuesday, November 07, 2006

2-4-6-8 Box

I know that some of my stamping friends have made these neat little boxes before and many of my hostesses have received little thank you gifts in them... I'm often asked how to make them so I wanted to share the instructions with you! They are so simple and can be made in different sizes just by adjusting the height of your card stock. The key is to keep the width at 8 1/2 inches (unless you also adjust all of the scoring measurements).

For this box, I started with a piece of card stock 8 1/2" wide and 9" tall that I stamped with The Snowflake Spot. Score the card stock across the width at 2", 4", 6" and 8" - now you know where the name came from for this box! These are the vertical score lines. You will have a 1/2" flap left on one side... you'll see what this if for soon. Now, turn your card stock 90 degrees and score one side at 2" - this is the horizontal score line. You can click on the pictures to enlarge them and see more detail.

Next, cut along the vertical score lines from the bottom to the 2" vertical score line. You'll be making 2" cuts on your 4 vertical score lines. Now, fold along all of the score lines and use the bone folder to get a crisp fold. Run adhesive all along the 1/2" flap on the stamped side and stick it to the inside of the other end of the card stock. You should see your box starting to take shape now.

Use adhesive to stick the bottom flaps of the box down. I like to put adhesive on two of the bottom flaps, then fold one with adhesive in, stick the next one with adhesive to it, then stick the next flap onto it (this one doesn't have adhesive on it) then you just have to put adhesive on the inside of the last flap to stick it down. Then stand your box up and press the bottom with your bone folder to make sure it is stuck well.

Next, you need to fold the top - I use my pointer fingers to push two of the sides in as I bring the top of the box together... I know that sounds confusing but hopefully the photo helps!

Using a handheld rectangle (or other shape) punch, punch two holes for the ribbon to be thread through - you'll be punching through 4 layers of card stock so you'll need to squeeze hard on the punch! You can make a tag and tie it on to the ribbon. I find that 11" of ribbon works well to tie a nice bow on the front.

Okay, it's not as difficult as it sounds... if you're not sure, try making one with a piece of photocopy paper first then move on to card stock when you have it figured out. Try making these in all different sizes for different gifts. They are great little boxes for small gifts and are really quick to make once you know how.

Happy stampin'!

Bev.

(Images copyright 1990-2006 Stampin' Up!)

Thursday, October 26, 2006

A Mini Bag for Note Cards

Some of you will have seen this little bag that I learned how to make for 3" x 3" note cards. It's a simple little project so I thought I would share with you how to make one.

I used the Holiday Thyme Designer Series Paper from the Holiday Mini Catalogue. It's some of our double-sided paper which makes it nice because there is a pattern on both sides. It's also a really nice weight for this project.

I like the Wishing You stamp set for these little note cards - they are a nice size and you can make several note cards quickly. And, using the pre-cut and scored Love Notes which are available in the Holiday Mini Catalogue, makes these projects even quicker!

I cut a piece of the Designer Series Paper to 5 1/2" x 5 1/2". Then I scored it at 2 1/4" from one side, turned it and scored the opposite side at 2 1/4". On the two sides that have not already been scored, I scored each in at 1". When scoring on Designer Series Paper, you want to be sure not to push too hard as you may actually cut the paper.

Fold the paper along the score lines, using a bone folder to get a crisp fold. Now cut as shown in the picture - along the 2 1/4" score line until it meets the 1" score line. You will cut four times. You can now form the box, sticking the sides together with adhesive. I just used SNAIL adhesive and it's holding fine!

Next, I put the stamped image on the front and then used a piece of the Stitched Grosgrain Ribbon to form the handle. It's all one piece of ribbon - start at the bottom, wrap it up one side and adhere with SNAIL adhesive in a few spots along the way, make the handle, then continue back down the other side to the bottom where you will wrap it around and continue up the other side of the bag the same way. I used the ribbon right off the spool and cut it at the end so that I used just the right amount.

You can adjust the measurements on these little bags to suit whatever you want to put in them. You might just practice on a piece of photocopy paper first until you get the right dimensions then make your good one...

Of course, I needed some note cards to put into this cute little bag so here are some samples. They are all made with the Wishing You stamp set. I used the Love Notes from the Winter Mini Catalogue in Cranberry Crisp and True Thyme. Then I used little leftover pieces of the Holiday Thyme Designer Series Paper and some of the Stitched Grosgrain to dress up my cards.


Happy stampin'!

Bev.

(Images copyright 1990-2006 Stampin' Up!)

Monday, October 16, 2006

Getting a better stamped image

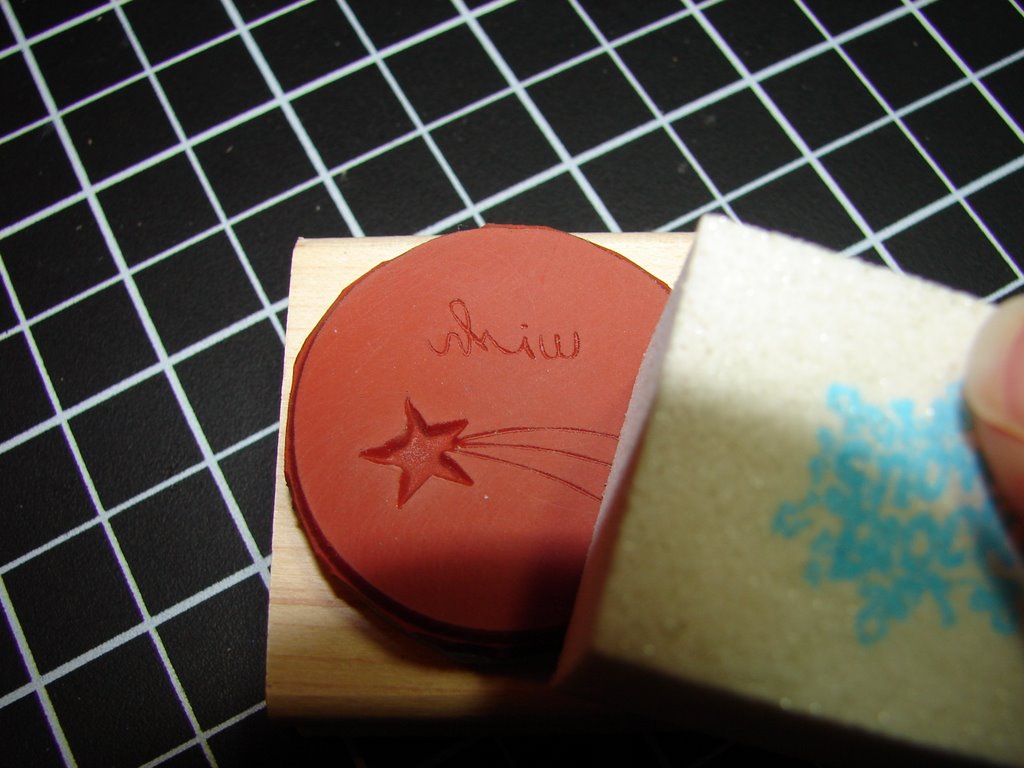
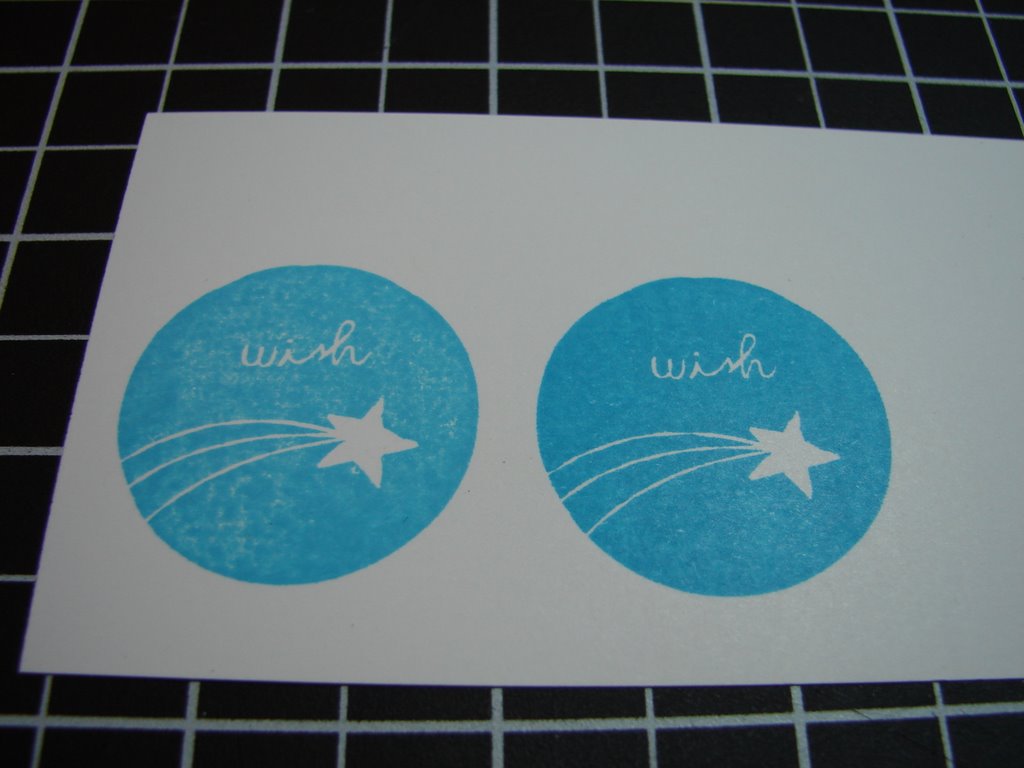
Have you ever noticed that when you stamp with a solid stamp, it's hard to get a clear image? Here are some tips to help.

Use a Sanding Block or fine sandpaper to gently sand the surface of your stamp. This will help the ink stick to the stamp. I find that going in small circles works well. I sand over the surface of the stamp 5 or 6 times. Then clean your stamp and try using it. If it's still not working well, try sanding it a little more.

When inking your stamp, try twisting it onto the stamp pad and then tapping - twist and tap. Twisting helps pick up ink and tapping makes sure the ink is well distributed and you don't have the streaks from twisting.

This photo shows a stamp from the Wishing You the Best stamp set that I inked and stamped brand new then sanded and stamped again. Although it doesn't show quite as much in the photo, the second image is much crisper and clearer.

Happy stampin'!

Bev.

Saturday, September 30, 2006

Bleaching


I was looking through my card samples a few days ago and realized that it has been a while since I have done any bleaching. Here's a card that I created a little over a year ago for an Open House. Some of you will remember making it...

First, I stamped the flower image from Natural Beauty onto Bravo Burgundy card stock using VersaMark ink. Then I embossed it with Black Emboss Powder. This step is important because if you were to just stamp the image with ink, the bleach would discolour the ink. Bleach doesn't change the Emboss Powder though.

After I punched the images out, I painted bleach on the flower petals and let them sit to dry. As the bleach absorbed into the card stock and dried, the card stock turned a nice yellow colour. It reminded me of So Saffron so that's what sparked my colour combination on this card.

A few important tips for bleaching...

1. You don't want to use a paint brush with natural bristles as the bleach will destroy your brush. Stampin' Up!'s Aqua Painters work really well - they have synthetic bristles which are not damaged by the bleach. They are also fantastic for this project because you can put the bleach right in the barrel of the Aqua Painter and then it will flow out of the brush consistently.

2. Bleach loses its power after it's been exposed to light. You'll want to be using your bleach within a few hours of filling the Aqua Painter. If you try using bleach that has been in your Aqua Painter for a while and it's not working, pour it out and refill with fresh bleach.

3. Once you have used an Aqua Painter for bleach, it should not be used for water. Since the Aqua Painters come in a set of two, I've dedicated the one with the blue lid for bleach and the one with the white lid for water.

4. Different colours of card stock will bleach differently. As shown on this example, the Bravo Burgundy turns a beautiful yellow, like So Saffron. Others turn completely white. Play with your card stock and bleach to see what happens! Oh, and you can also bleach your card stock again if necesary - to cover a missed spot or to try to lighten the card sock even more.

5. After bleaching the colour out of your card stock, you can add colour using crayons or inks.

Have fun playing with bleaching... just remember to protect your workspace and yourself in case of any accidental spilling of bleach!

Happy bleaching!

Bev.